Adding Game Polish: Animating with code to bring your game to life
- Intro
- Learning how to walk
- Using curves to make things feel real
- The code that makes this happen
- Making grass more grassy and coins more coiny
- That's all it takes!
When building and shipping a game - whether it's your first full game or 100th game jam you are always limited by time. Time to ship the game before the next AAA game release eats up everyone's attention, time before your next milestone delivery, or time before the jam's submission deadline ends. When you have these time constraints constantly hovering over your head, adding polish might be the last thing that you want to do - especially if you're a team with limited resources. Thankfully, it doesn’t always have to be a compromise.
Learning how to do quick animations in code can bring your game from looking like this:
To this:
When you have your core loop in place you can set up system like this in a matter of minutes and make your game really stand out.
Same sprites, no changes in behaviour, just added animations. The good thing about this is that once you’ve made this type of implementation in one place, you can add it in as many other places as you want, the underlying system is the same for all of these animations.
This example is made in Unity but the code is very simple and should be possible to transfer to other engines as well. It’s not as much about the code, it’s mostly about the shapes of the curves.
Alright, let’s look at how animations like these are set up and work!
Learning how to walk
The player's walk animation is made up 3 different types of animations:
- A positional movement
- A rotation
- A scale animation
Putting them all together results in this animation:
The good thing about this system is that it all follows the same structure. It's all built around a timer that goes from 0 to 1 and uses a curve to get the value. It’s no more complex than that!
Using curves to make things feel real
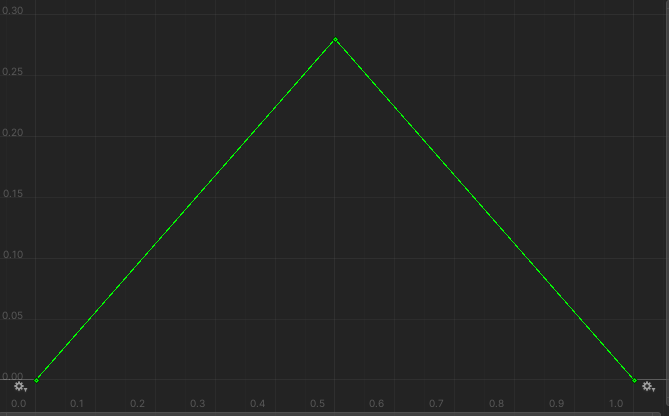
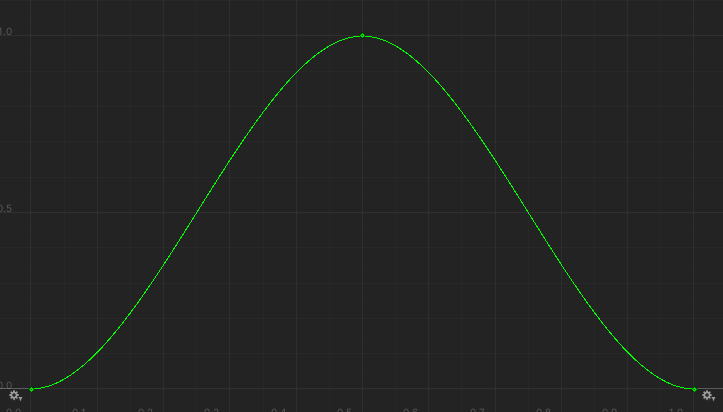
Everything in our physical world has an acceleration and deceleration. Nothing can go from 0 to 100 in an instant. This is why linear curves often feels very unnatural when implemented. Here’s an examples showing a linear curve and a smoothed curve.
Linear
Smoothed
As you can see, the linear curve feels very unnatural and robotic compared to the smoothed one. The first one feels like it’s just moving up and down, but the second one looks like it’s jumping. This is because of acceleration and deceleration.
The linear curve looks like this for this jump:
And the smoothed one looks like this:

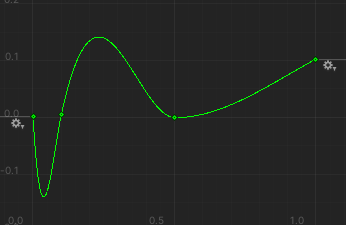
The smoothed curve starts off with a high acceleration and then slows down to an almost complete stop at the top and then starts the deceleration down again giving a more natural look to the jump of the character.
All of the animations in this animation use this type of curve, just with slightly different values. So you can see this curve as the “base curve” going forward for our animations. We want the rotations and scaling to sync to this curve, so we’re using the same curve to make them line up with their animation.
The code that makes this happen
So how would an animation system like this look in code then?
It’s very simple, we only need a few things:
- A timer that goes from 0 to 1 and goes back to 0 when equal to or above 1
- A smoothed curve
- Ability to change position, rotation, and scale based on this curve
Let’s start off by adding some variables:
And then in Update(), we create a timer that goes from 0 to 1 and then resets:
Our timer will now loop endlessly with the set framerate in Unity.
Next we will change the position of our sprite using our smoothed curve:
With just these lines of code and our curve we now have the “base animation” set up.
So now that we have the base animation set up, adding the other animations is as simple as running it with different values.
For rotation, we want the character to rotate to the left and right side on every other step. So, we first add an integer that will control the direction of the rotation:
And then a variable for controlling the amount of rotation we want:
Then in our Update() function, we change the direction of the rotation every time the timer reaches 1 by multiplying with -1 (-1 x -1 = 1, 1 x -1 = -1):
Then we just change the rotation of our character sprite:
And with this, we have added rotation to our animation!
By tweaking the rotationAmount value, we can get different types of looks for our animation as well, here’s a more “goofy” one:
Don't forget to stretch
For scaling, we will do essentially the same thing as with the other animations. But there is one addition here - stretching. We don’t want our character to scale only on one axis, as doing this results in unnatural looking stretching. You can think of pulling on a piece of cloth, if you stretch it in one direction, it will get thinner in the other direction.
Here’s an example on “unnatural” stretching, and “natural” stretching;
Unnatural
Natural
So when we scale on one axis, we decrease the scale by the same amount on the other axis. So if we increase the Y-scale to 1.2 we will decrease the X-scale to 0.8. Simple as that!
To support this let's first add a value to decide how much scale to use in our script and also how much “stretching” we want:
And then in our Update() function we set the scale to our move-curve values:
And by putting all of these together we get this result:
Best of all, everything here was achieved with just one curve, used in different ways.
Not using Unity?
If the game engine that you are using does not include a curve editor, a similar curve to the one we have made can be made with some mathematical functions.
- A triangle wave going from 0 to 1 and back to 1 (a linear curve)
- An ease out quad algorithm to smooth out the linear curve
In summary, here’s how to implement it in much fewer lines of code just using the math:
This will get us roughly the same result, but without using a curve-tool.
If curves are available in your game engine however, I recommend you use those instead since it allows for easier tweaking to get the look and feel that you want for your game.
Making grass more grassy and coins more coiny
Grassy grass
Now that we have the character animated and moving, we can make the game world feel more alive by rotating the grass slightly to sell the concept of wind.
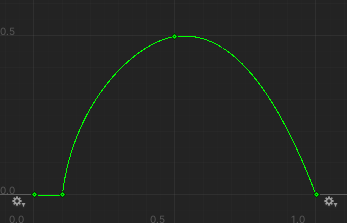
Doing this is just as simple as with the curves, only we want the curves to have a slightly different look, namely an ease in - ease out curve:
This curve will instead give us a smooth continuous movement for the grass:
The code for the grass is almost the same as the other functions. The difference here is that I’ve added a random start position of the timer, so all the grass starts with a different random rotation:
Coiny coins
Now, we just have one thing left to animate... the coins!
Currently they are just static in the world and not doing anything special. But just like the grass, with a few lines of code and some curves we can get them to grab the player's attention much better than before.
The coins use the same type of animation system as all of the previous examples. The only difference is how the curves look.
The coins are actually using two curves. One for position:
And one for scale:
If we put these two curves on top of each other, it should make more sense as to why they look like this:
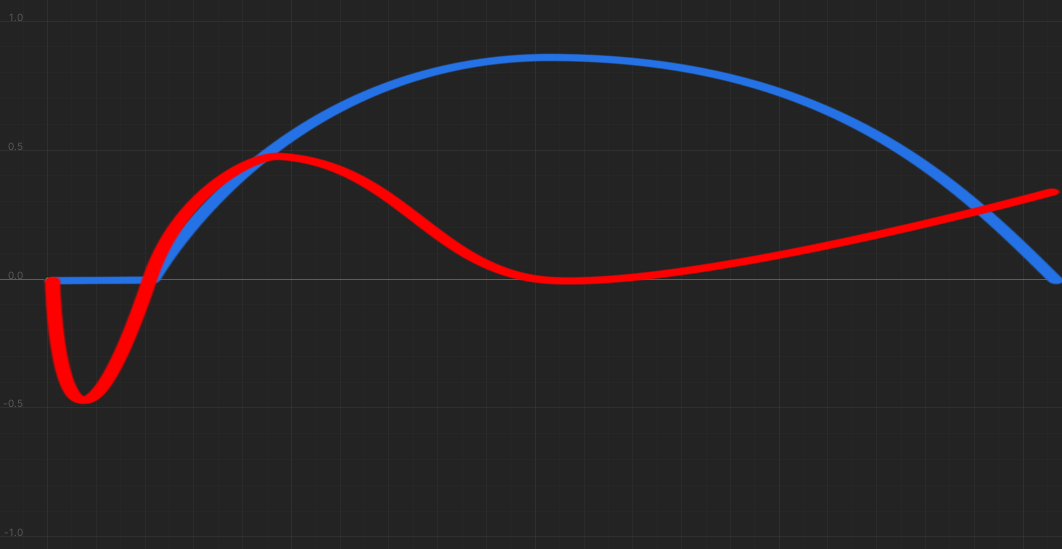
The blue curve is the positional animation and the red curve is the scale animation. For the first part of the animation the coin is still and gets squashed, making it look like it’s preparing for a jump with anticipation. Then when it jumps up into the air it will “wobble” and go back to almost its original scale. This animation is fast, so we get away with not going back to the original scale for the coin, which also gives it a more rigid “jellyness”.
The code for the coin animation is the same just with two curves instead of one:
And now with all of these animations in place, we are at a much better place than when we started out!
Before
After
That's all it takes!
These techniques will help save you time and resources, so you focus on what you do best: making your game great. Here at LootLocker we want to give you the tools needed to built, ship, and run your best games. That's why we plan to return to this topic in the future with more ways to polish your games quickly and easily.
As always, you can find me on Twitter where I try to share tricks and tips for making better games more easily as frequently as I can.