Implement Sign in with Google in your Unity & Unreal Game
- Intro
- Navigation
- Google Setup
- LootLocker Setup
- Adding Google Sign In to your game using Unity
- Adding Google Sign In to your game using Unreal
Implementing Sign in with Google is a common frustration among game developers. A lot of games utilize this authentication method. Despite this, there isn't much documentation on this subject out there. That's why we at LootLocker decided to take matters into our own hands. Follow along and let's get it working!
Navigation
We have split this guide into distinct sections so that you can either read it top to bottom, or go straight to the part you want to learn more about.
- Prerequisites for this guide
- Preparations in Google Cloud tools
- Preparations in LootLocker Console
- Adding Google Sign In to your game using Unity
- Adding Google Sign In to your game using Unreal
Prerequisites
This guide assumes that you already have a game project set up and able to build to the platform you will be targeting. Throughout the outlined steps, you will need your app's package name/bundle id (the name is different depending on your target platform). It follows this pattern "com.<organization>.<appname>" and needs to be unique for your game. A few different ways to find yours if you do not already know it are:
- In Unity, you can find it under Project Settings > Player > Other Settings > Identification > Package Name
- In Unreal, you can find it under Project Settings > Platforms - Android > APK Packaging > Android Package Name or Project Settings > Platforms - iOS > Bundle Identifier depending on target platform
- In Android Studio you can find it in the AndroidManifest.xml file (the field is called package) or in the build.gradle file (the field is called applicationId) depending on your build system
- In the Google Play Console dashboard for your game it is called "app name".
- In the App Store Connect overview page for your game it is under General Information > Bundle ID
This guide also assumes that you have a project set up in LootLocker. LootLocker is the plug and play game backend that makes cross platform feel like one platform. It helps you elevate your game from local to online in a simple way, adding functionality such as cloud saves, cross platform account management, and a versatile economy system, along with much more. If all you are looking for are details on how to add Google Sign In to your game, then you can skip the LootLocker parts of this guide. But if you are curious, you can read more here.
Google Setup
Using Google Play Console
If you plan to release your game to the Google Play Store, then start here. If not, head straight to Using Google Cloud Console. For this you will need to have an Active Google Play Console account.
Configure a project
In the play console you need to have a project configured. Google has some resources on this, and how you configure it depends to a large extent on your game, so we will not go through that here. The only important distinction is that the project you have configured should be a game.
Create credentials for the app
Go to Google Play Console > Play Games Services > Setup and management > Configuration. In the top right, press "View in Google Cloud Platform" and then continue with the credentials part of Using Google Cloud Console.
Using Google Cloud Console
To set up the prerequisites for authentication using Google you need to have a project for your game configured in the Google Cloud Console. If you already have one for the game you're building (which is automatically the case if you have created a project for your game in Google Play Console) then use that one. Otherwise create a project from the top left project selection dropdown > New Project. Input the organization and project settings applicable for your game.
Create Credentials for your game
Now to the part of the google setup that is crucial for authentication and subsequent LootLocker integration. Go to APIs & Services > Credentials. Here you will need to create credentials for all OAuth Client types your game will be utilizing. For Unity, you will only need a Web Client. For Unreal you will also need an Android Client for your Android builds, an iOS Client for your iOS builds, and additional client credentials if you are building for for example UWP, or desktop.
- Press
+ Create Credentials - Select OAuth client ID
- Select your application type
- Set a name of your choice, this is only the name of the credential in the console
- Add platform specific information
- For Web Clients, you can ignore the origin and redirect URLs unless you know that your game is utilizing this feature.
- For Android, enter the package name of your game (see Prerequisites) and the SHA-1 certificate fingerprint you will be using to sign your builds. Note that this is a crucial step and it is one of the most frequent causes of problems when implementing Google Sign In. It is unfortunately also a fairly complex and varying (it depends a lot on how your team is set up) topic. You can read more about the details in Googles documentation and in the Android Handbook. If you have multiple machines that produce builds (and this includes while debugging, so each dev machine counts) then they all need either their own Android Credential configured or to share the same SHA (used by sharing a keystore). We recommend the latter as only one client id can be configured to be used in the LootLocker console.
- For iOS, enter the bundle id of your game (see Prerequisites) as well as the App Store ID which is the ID of your game in the Apple App Store and the Team ID which is the id of your team from the apple developer console.
Create a service account
For LootLocker to integrate with your Google project you need to create a service account for the two services to communicate.
- Press
+ Create Credentials - Select Service account
- Set a name of your choice, this is only the name of the service account in the console
- Set an id for the service account. The only real requirement is that it's unique, but we suggest you set something descriptive and since this is used for LootLocker integration you could set it to
lootlocker - In step 2 (called "Grant this service account access to project") you need to add the role:
Service Account Token Creator
LootLocker Setup
To enable your players to utilize all the power of LootLocker while authenticated with Google you need to configure your game to support Google Sign In.
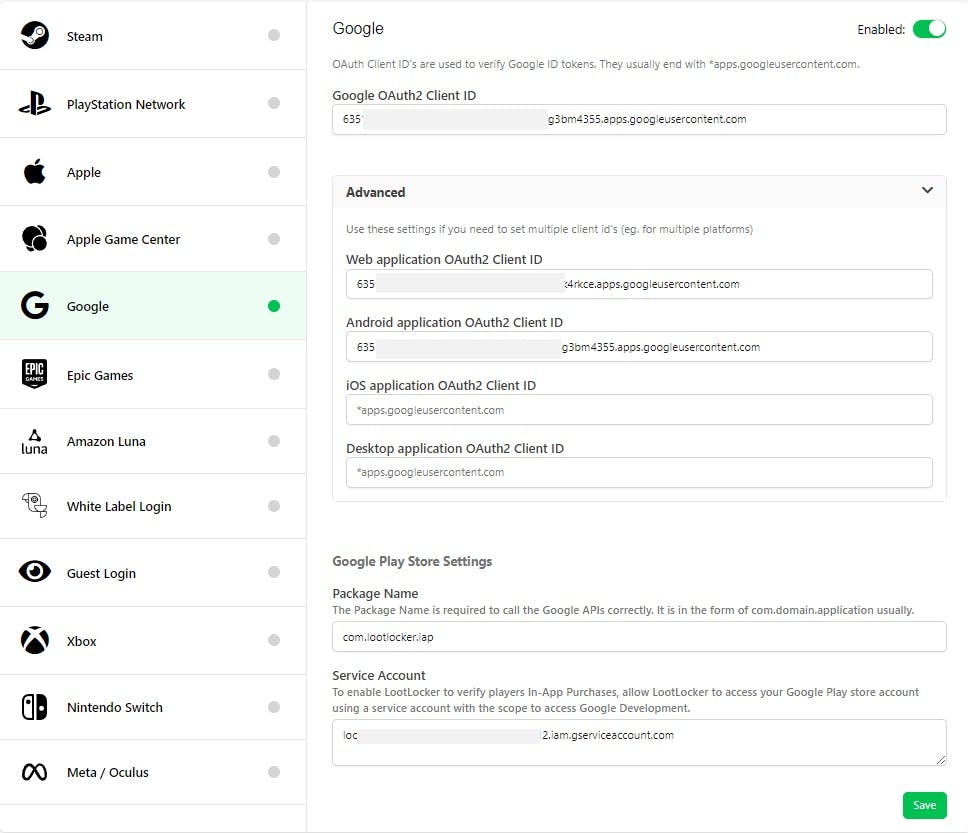
Go to Platforms and enable Google.
- For the Google OAuth2 Client ID: Use the Web Client OAuth 2.0 Client ID from Google Cloud Console.
- Add the Package Name that you use in your build and in the google configuration.
- Add the service account from Google Cloud Console (use the service account email).
- Optional: Under advanced settings, you may configure individual platform client ids that you have configured.
Adding Google Sign In to your game using Unity
Project Setup
- Ensure you have installed the Android Build Platform
- Switch Platform to Android
- (Optional) Set Development Build to true for easy debugging
- (Optional) Install Android Logcat from Package Manager
- Go to Player Settings
- Underneath Publishing Settings
- Set Release under Minify to true
- Underneath Other Settings
- Set Override Default Package Name to true
- Set the Package name to your package name (see Prerequisites)
- Set Scripting Backend to IL2CPP
- Set Target Architectures to ARMv7 and ARM64
- Underneath Publishing Settings
Google Sign In Plugin
- Install the Google Sign in Plugin. This Plugin uses a Web Client ID, not a native Android Client ID, this means the Plugin can be used on both Android and iOS devices.
- The Plugin is fairly old so there are some additional steps needed
- Go to Assets/Parse/Plugins
- There should be two .dlls Unity.Compat and Unity.Tasks
- Select both .dlls and deselect Auto Reference and press Apply
- You should then see all your errors disappear!
- Install the Resolver Plugin
- Run the unitypackage inside the zipfile
- Open
\Assets\{UnityProject}\Editor\m2repository\com\google\signin\google-signin-support\1.0.4in your file explorer - In here you should see 6 files with the filetype .scaar. These needs to be renamed into .aar, even the .meta.scaars
- Back in the editor go to the same path and select the file
Google-signin-support-x.x.xand enable Android as included Platforms.
C# In Unity
Create a new C# Script for Signing in with Google and add the reference using Google;
Lets start by creating the Google configuration:
Note: Remember to use your own Web client ID otherwise it will fail.
Note: We also set the configuration directly to the GoogleSignIn class, this is because we cannot modify the configuration once we've called the Default Instance the first time.
In our configuration specify that we want Google Sign In to return the ID Token. The ID Token is what we will later use to authenticate the player with LootLocker.
We also set "useGameSignIn" to false. Setting this to true activates the "Play Games Services" instead of the "stock" Google authentication, which is not what we want in this case.
Now you may be confused on how the function onAuthenticationFinished will be called. It is a callback that you register when starting the sign in process as so:
It would probably be smart to do more error handling in case it does not succeed, but that depends on your project. However, if you were to run this code now, you should see a pop up to select a Google Account and once you've selected, your token should be filled out.
Starting a LootLocker Session
Now that we have gotten a token from Google, we can finally Authenticate with LootLocker and start a session.
And there we go. You should now have authenticated with LootLocker and Google.
Adding Google Sign In to your game using Unreal
Prerequisites
You need to have set up Unreal Engine for development of the platform that you will build to. Epic provides some guides on this topic, so make sure that you have properly followed the one for your platform, for example Android or iOS.
Next, you will need to install the "Online Subsystem for Google" (you can read more about Online Subsystems here) plugin for the editor version you're using and copy it into the project plugins folder (it doesn't work with it in the editor plugin folder). You do this by going to the Engine install location and copy the plugin folder (<Engine Install Location>/Engine/Plugins/Online/OnlineSubsystemGoogle) into your projects plugin folder (<Project Folder>/Plugins, if it doesn't exist yet then create it).
Configure the Editor
-
In Project Settings > Platforms > Android > APK Packaging
- Set Android Package Name (needs to be the same as in Google Play Console, Google Cloud, and LootLocker).
- Set the application display name
-
In the file DefaultEngine.ini (or a platform specific ini file if that suits your need) located in (<Project Folder>/Config/DefaultEngine.ini) add these sections with the ids you set up during Google Setup:
[OnlineSubsystemGoogle]
bEnabled=true
GamesAppID=<AppID from GCLOUD>
ClientId=<Android OAuth ClientID from GCLOUD>
ServerClientId=<Web Client ID from GCLOUD>
ClientSecret=<Web Client Secret from GCLOUD>

[OnlineSubsystemGoogle.OnlineIdentityGoogle]
+ScopeFields="https://www.googleapis.com/auth/userinfo.email"
+ScopeFields="https://www.googleapis.com/auth/userinfo.profile"
- If you have not already done so, then add the LootLocker plugin
Code in Unreal
The Online Subsystems do not natively have any Blueprint exposure, so you will need to delve into C++ to build Google Authentication. This guide will however help you make the blueprint nodes necessary to then build your sign in flow in blueprints if that is more your speed.
Add the subsystem to the project
Add the generic Online Subsystem to your private dependency modules in your project's build.cs file and add the Google online subsystem to any platforms where you intend to use it.
Create a class to hold our logic
Create a class that we will extend with the logic we need throughout this guide. Here we've named it GoogleSignIn but you can name it whatever you wish. Place the header in Project Folder/Source/Project Name/Public and the cpp file in Project Folder/Source/Project Name/Private
Add subsystem initialization
To the GoogleSignIn class add an Initialize method that will initialize the google subsystem and keep a pointer to it.
Add a convenience method to check that the subsystem exists
To the GoogleSignIn class add a HasGoogleOnlineSubsystem method that we can use in our sign in flow logic to enable or disable UI related to Google Sign In.
Add sign in logic
Now to the good part: actual sign in. First, here's the example code:
There are a few things going on in this step:
- We add data classes that can contain the data of the user that we are looking for, that is the
FGoogleUserDataandFLoginCompletedResponseclasses. TheUSTRUCTandUPROPERTYmacros cause the class to be usable in blueprints. - ´DECLARE_DYNAMIC_DELEGATE_OneParam(FLoginCompletedCallback, FLoginCompletedResponse, LoginResponse);´, this makes the callback possible to listen to from blueprints and c++.
- We add the
SignInWithGooglemethod that takes a local user number for whom to start the login process. Unless your game has multiple local players you will always use 0 here. It also takes a callback that will be called when the login process has completed, either successfully or unsuccessfully. The bool that is returned from this method tells you whether the process started ok or not. - We add an internal
LoginCompletedHandlerwhich handles the response from the google subsystem and extracts the data we want upon login. - We add a handle that keeps track of the asynchronous login processes called
FDelegateHandle. - Note that
SignInWithGoogleandLoginCompletedHandlerdoes some error checking, but you may want to add some logging or extra error handling. - Upon a successful login we populate the user data class with all the information that we may want to use in our game. Most importantly, we extract the ID Token that is needed for LootLocker authentication using
GetAuthAttribute(AUTH_ATTR_ID_TOKEN, UserData.IdToken);.
Full example
The previous steps have all been incremental changes. Here's a full copyable example of the code.
Sign In to Google and start a session with LootLocker
From code
Now that you have the Google Sign In class, you simply need to utilize those methods in a place in your code that suits your project.
For example:
- During game initialization call
UGoogleSignIn::Initialize. - When initializing the UI you have built for sign in then to decide whether to show the Google Sign In option call
UGoogleSignIn::HasGoogleOnlineSubsystem. - Then when sign in is triggered, likely from a button in a menu system you've built, call
UGoogleSignIn::SignInWithGoogle. - On a successful response from Google Sign in, Start a Google Session with LootLocker using either the
ULootLockerSDKManager::StartGoogleSessionForPlatformmethod specifying the platform you're signing in from, or theULootLockerSDKManager::StartGoogleSessionif you don't want to specify a specific platform. For this call, you need to use the ID Token that was returned in theUGoogleSignIn::SignInWithGooglecallback.
From Blueprints
Use the nodes we created in Add sign in logic to create your sign in flow. Here's an example of what that could look like given the created nodes.
The steps you need are to:
- Initialize the subsystem. This you will likely want to do during game start up.
- When appropriate in your system, likely when bringing up the sign in UI, check that the Google Subsystem is working to decide what UI to show.
- When appropriate, likely triggered by user action, trigger the sign in flow that will call the "Sign In With Google" node and then using the ID Token (returned from Google Sign in callback) start a google session in LootLocker using either the "Start Google Session" node or the "Start Google Session For Platform" depending on whether you want to utilize platform specific sign in or not.
- If that flow succeeds, then you can utilize the full power of LootLocker and your player can continually use their Google auth to access their data.
And there you have it - implementing Sign in with Google in both Unity 3D and Unreal Engine. We hope that these guides have made your life considerably easier giving you more time to spend actually making your game. If you liked this guide, please let us know in our Discord channel or on Twitter.