Setting Up Online Leaderboards in a Construct 3 Game

- Intro
- Before You Start
- Creating the Leaderboard in LootLocker
- Implementing Your Leaderboard in Construct 3
- Switching Between Stage and Live Environments
- Now, this is only the beginning!
While lots of indie games are built using the Unity game engine, we love seeing all the creative experiences built with all the other game engines out there. Since we believe amazing games can come from every corner of the Earth by teams of all sizes with technology of all types, it’s only fair that we make sure LootLocker can be used with every game engine. While we plan to support game engines like Construct 3 with an official SDK in the future, for now we hope this guide can help you get one of our community’s favorite features, online leaderboards implemented in your Construct 3 game.
Before You Start
In this example, we will use AJAX and JSON-files to implement a leaderboard with LootLocker in Construct 3 using LootLocker’s REST API. This example will show how to:
- Start a LootLocker session using Guest Login
- Upload a score to a leaderboard created in the LootLocker dashboard
- Update the leaderboard with new scores
- Manage a returning player
You can use this guide to implement high scores in an empty project or in an existing project. With the link below you can also download the source code of this project to use as reference.

Using the same structure as below you can implement every LootLocker feature. If you run into any issues or have any questions, feel free to reach out to us on Discord.
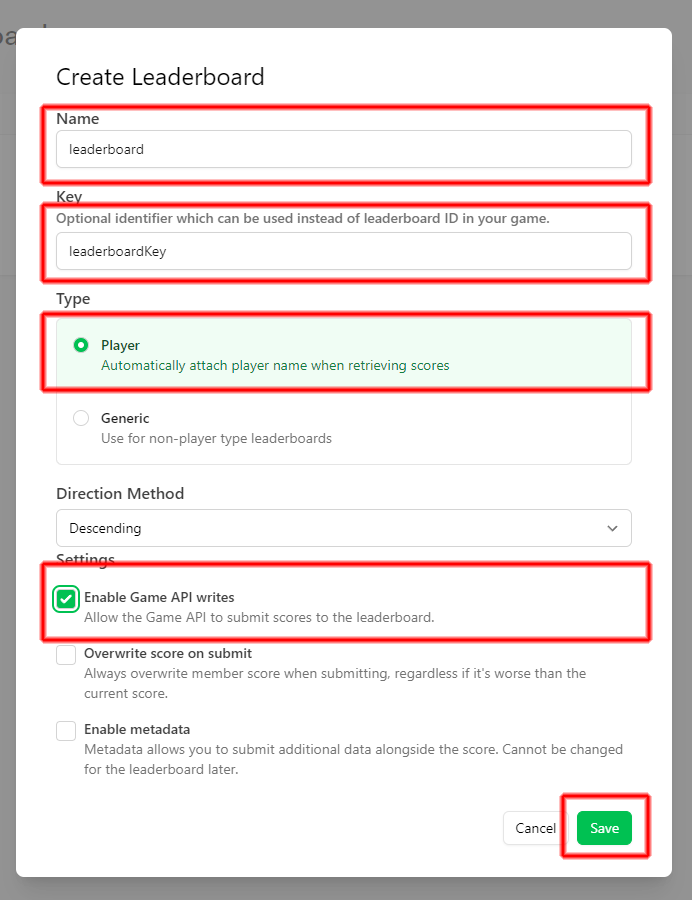
Creating the Leaderboard in LootLocker
Before we open up our Construct 3 project, let’s first create a free LootLocker account, set up a game in LootLocker, and create our leaderboard.
- Create your free LootLocker account by signing up. Follow the steps after creating your account to create your first game.
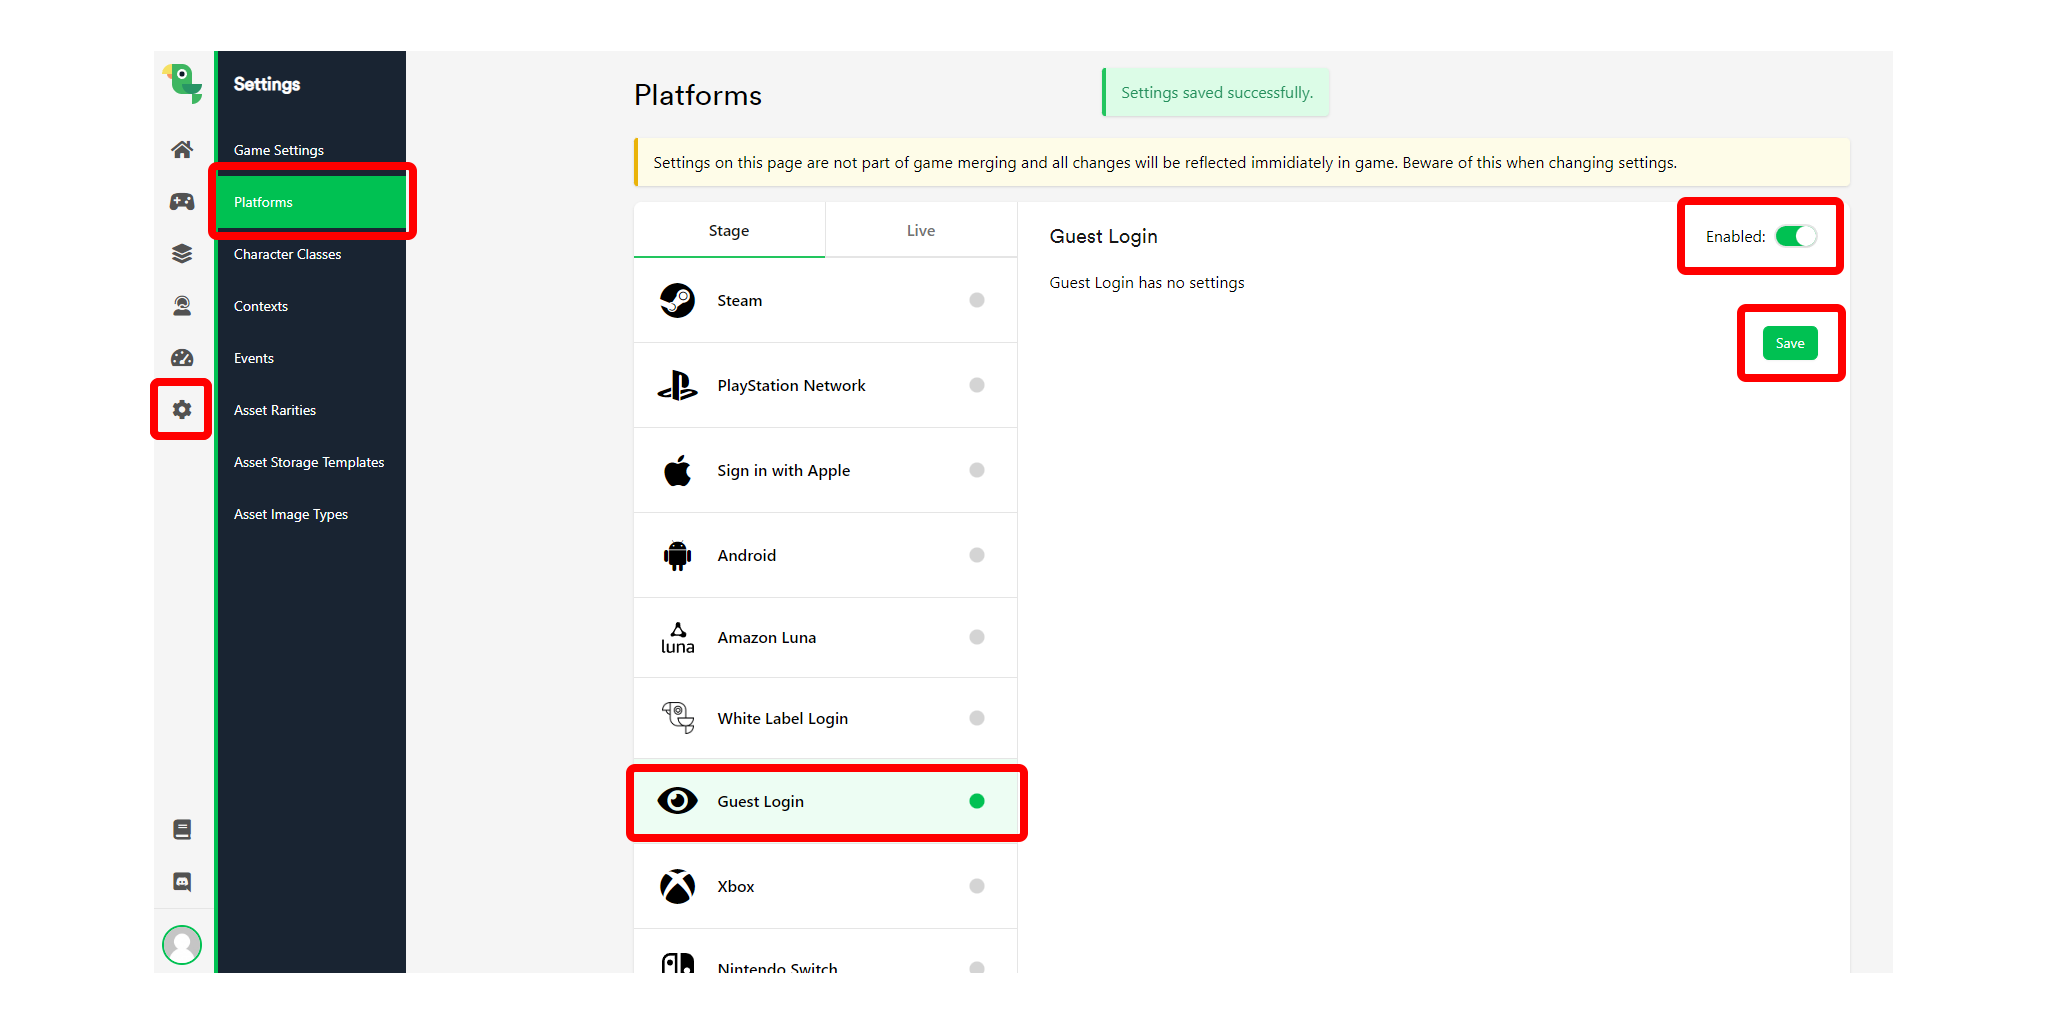
- Next, navigate to Systems, Platforms, select Guest Login, Enable and then click Save

Implementing Your Leaderboard in Construct 3
Alright, now it's time to implement this leaderboard in our Construct 3 project.
Initial Setup
- We first need to create a few Objects to store our data and to be able to make requests to the server. Right click Object types in the Project tab and select Add new object type.
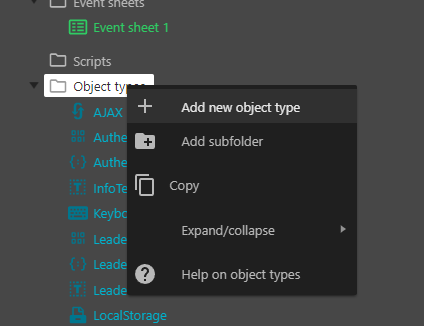
- JSON named AuthenticationJSON
- JSON named LeaderboardJSON
- JSON named ResponseJSON
- JSON named SubmitScoreJSON
- JSON named SessionJSON
- BinaryData named AuthenticationBinaryData
- BinaryData named LeaderboardBinaryData
- BinaryData named ScoreBinaryData
- LocalStorage named LocalStorage
- AJAX named AJAX
- Keyboard named Keyboard
- Text named LeaderboardText
- Text named ScoreText
Now we have created all the needed objects and variables.
Player Authentication
Now we’re going to implement player authentication. Authentication is needed before you can call any other requests to LootLocker.
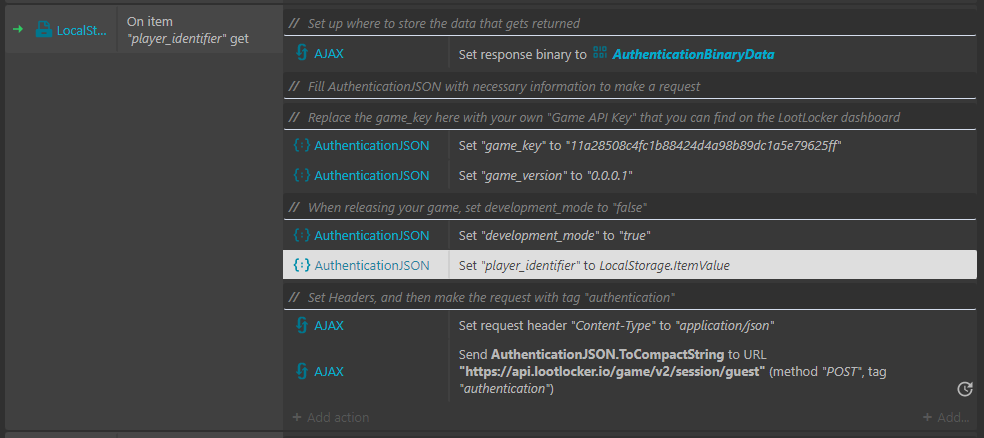
- Create a System | On start of layout event, and in there check if item “player_identifier” exists in LocalStorage;

In this example, a user will be tied to their machine, if a user has been created on "this” machine, they will log in with the same ID the next time they play
- AJAX Set response binary to AuthenticationBinaryData
- path: “game_key”, value:”your-game-api-key”(that you can find on the LootLocker dashboard)
- path: “game_version”, value:”0.0.0.1” (the version of your game, needed for more advanced features)
- path: “development_mode”, value:”true” (true while you are working, change it to false when releasing)
- path: “player_identifier”, value:”LocalStorage.ItemValue”
- Header:"Content-Type", Value: “application/json”
- tag: “authentication”
- URL: "https://api.lootlocker.io/game/v2/session/guest"
- Data: AuthenticationJSON.ToCompactString
- Method: “POST”
Here is the full event for reference:
Now we’re going to handle the information that we get back from the response.
- Add a new AJAX: On Completed event
- Tag:”authentication”
- Add actions:
- AuthenticationJSON Set JSON
- path:”response”
- JSON string:AuthenticationBinaryData.GetText(0, AuthenticationBinaryData.ByteLength)
- LocalStorage Set Item
- Key:”player_identifier” (player_identifier is the identifier for a player, we use LocalStorage to save it so we can handle a returning player)
- Value:AuthenticationJSON.Get("response.player_identifier")
- SessionJSON Set Value
- Path:”session_token” (session_token is used to know that the player is verified, that’s why we save it)
- Value:AuthenticationJSON.Get("response.session_token")
- SessionJSON Set Value
- Path:”player_id”
- Value:AuthenticationJSON.Get("response.player_id")
- Optional Step: if you want to view the server response without debugging you can create a new Text Object and add it to your Layout
- Use Set Text action and set the text to AuthenticationBinaryData.GetText(0, AuthenticationBinaryData.ByteLength)
- AuthenticationJSON Set JSON
Here is the full event for reference:

Leaderboard
Great, we should now be authenticated against LootLocker's server, from here on all features of LootLocker are available to use with the Rest API. But for this guide we’ll continue with leaderboards.
Now we’re going to upload some scores to our leaderboard.
In this example, I’m uploading scores when pressing spacebar, but for a “real game” you probably want to do this when the player dies or similar, so I suggest that you either move these actions to where you want that to happen or move them to a function and then call that function.
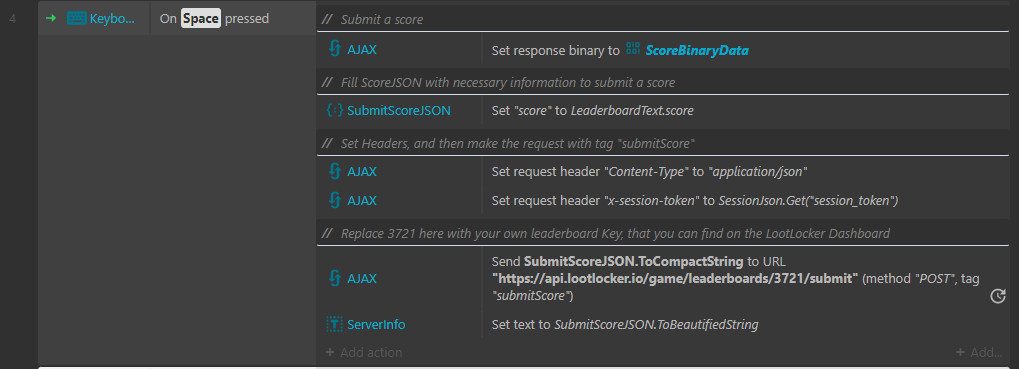
First, create a new Keyboard On Key Pressed event, with spacebar as the key. Then add the following actions:
- AJAX Set response binary to ScoreBinaryData
- SubmitScoreJSON Set Value
- Path: “score”
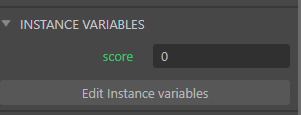
- Value:LeaderboardText.Score (this is the instance variable that we created earlier in the guide)
- AJAX Set request header with parameters
- Header: “Content-Type"
- Value: "application/json"
- AJAX Set request header with parameters
- Header: "x-session-token"
- Value: SessionJson.Get("session_token")
- AJAX Post to URL
- Tag: “submitScore”
- URL: "https://api.lootlocker.io/game/leaderboards/0000/submit" (Replace 0000 here with your own leaderboard Key, that you can find on the LootLocker Dashboard)
- Data: SubmitScoreJSON.ToCompactString
- Method: “POST”
Here is the full event for reference:
Great! A score should now be uploaded to the leaderboard when pressing spacebar, you can now login to your LootLocker Dashboard to see if a score was added to your leaderboard.
Now we’re going to retrieve the leaderboards in our game when pressing enter. Depending on when in your game you want to show your leaderboards, I recommend that you move this code into a function and call that when you want show the leaderboards instead (keep in mind that the authentication must be completed before, you can not retrieve the leaderboards without getting a successful response from the server first).
Getting the leaderboard is as simple as this.
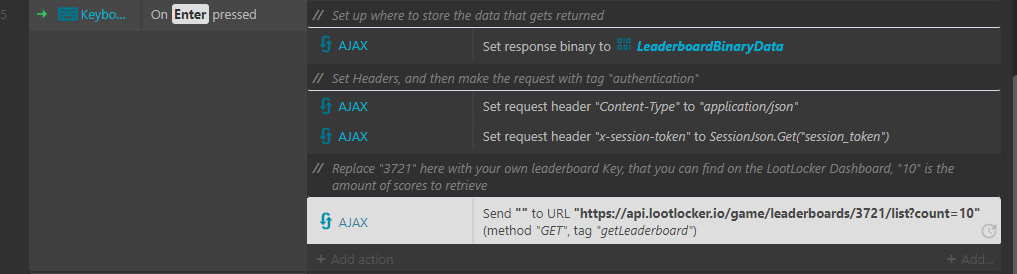
Create a new Keyboard On Key Pressed event, with Enter as the key. Then we add the following actions:
- AJAX Set response binary to LeaderboardBinaryData
- AJAX Set request header with parameters
- Header: “Content-Type"
- Value: "application/json"
- AJAX Set request header with parameters
- Header: "x-session-token"
- Value: SessionJson.Get("session_token")
- AJAX Post to URL
- Tag: “getLeaderboard”
- URL: "https://api.lootlocker.io/game/leaderboards/0000/list?count=10" (Replace "0000" here with your own leaderboard Key, that you can find on the LootLocker Dashboard, "10" is the amount of scores to retrieve)
- Data: “”
- Method: “GET”
Here is the full event for reference:
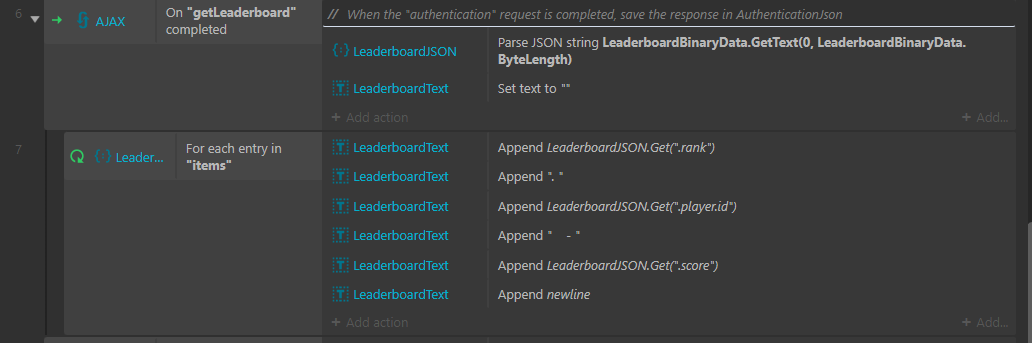
Now we’ve sent a request to the server that we want to receive the leaderboards, so now we just need to decide what we should do with the information when we retrieve it.
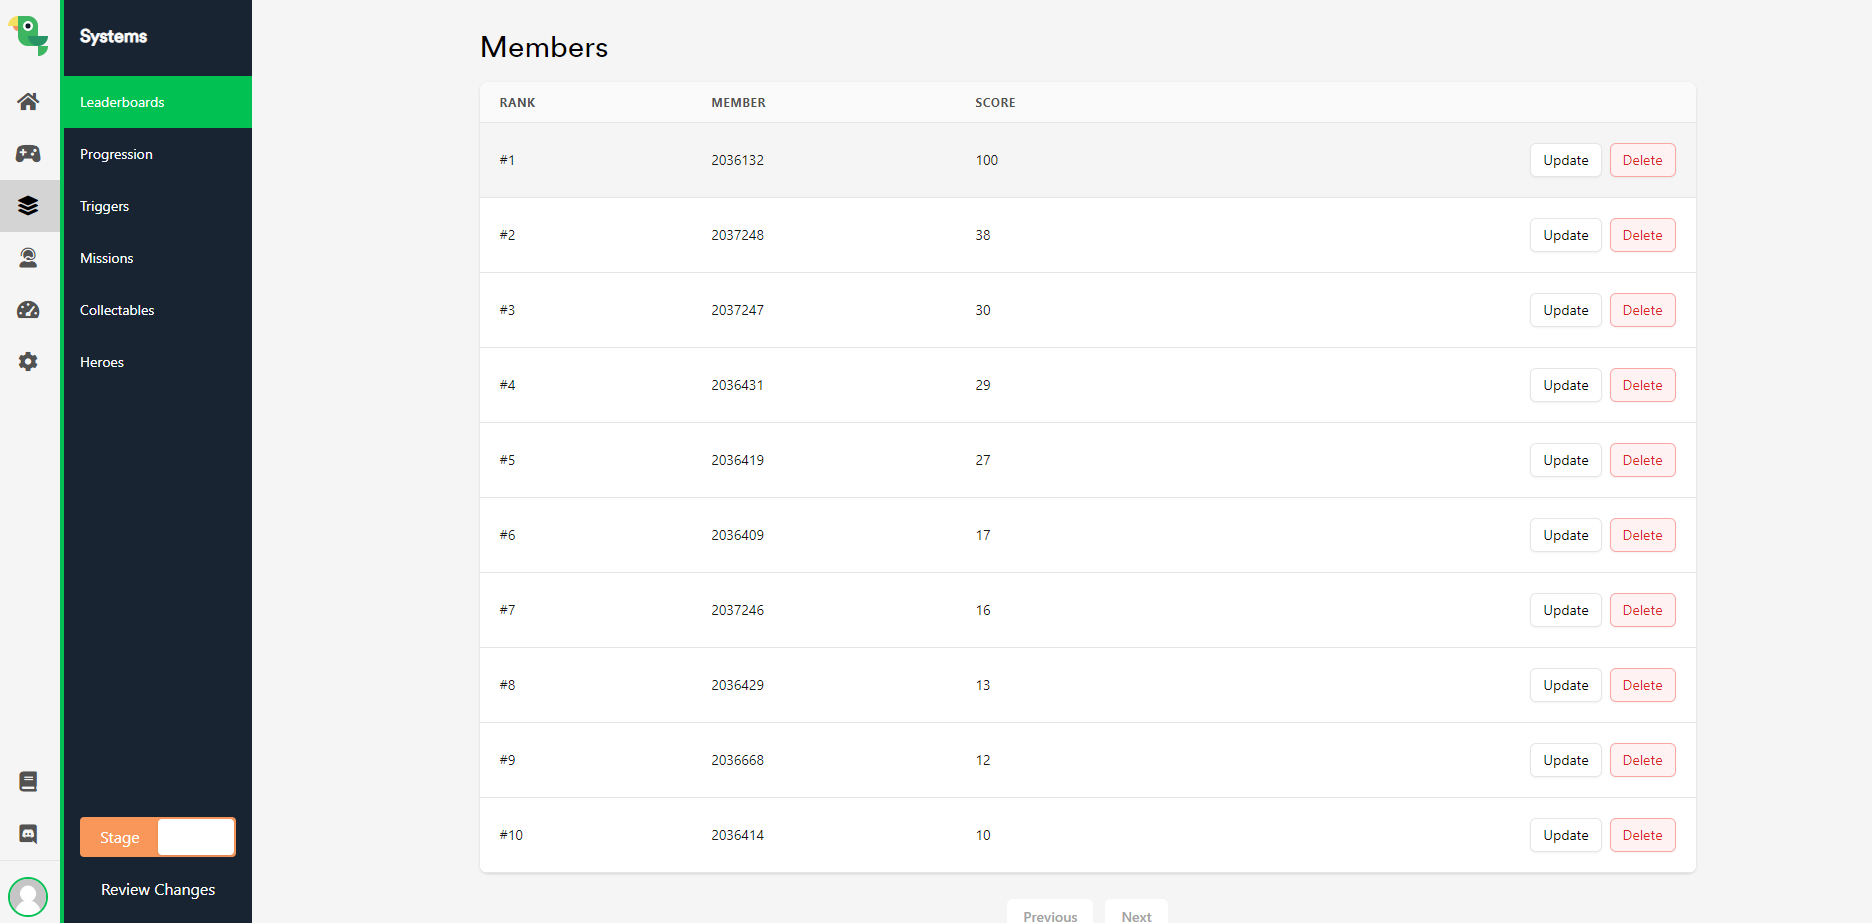
- Add the LeaderboardScore Text object to your Layout.
- Add a new AJAX: On Completed event
- Tag:”getLeaderboard”
- Add actions
- LeaderboardJSON Parse
- JSON string: LeaderboardBinaryData.GetText(0, LeaderboardBinaryData.ByteLength)
- LeaderboardText Set text
- Text: “”
- LeaderboardJSON Parse
- Add a sub-event on the AJAX: On Completed event
- LeaderboardJSON For each
- Path: “items”
- Inside the for each loop, we’re going to format the text we get from the server so it looks like a leaderboard. Add these actions
- LeaderboardText: Append Text
- Text: LeaderboardJSON.Get(".rank")
- LeaderboardText: Append Text
- Text: “. “
- LeaderboardText: Append Text
- Text: LeaderboardJSON.Get(".player.id")
- LeaderboardText: Append Text
- Text: “ - “
- LeaderboardText: Append Text
- Text: LeaderboardJSON.Get(".score")
- LeaderboardText: Append Text
- Text: newline
- LeaderboardText: Append Text
- LeaderboardJSON For each
Here is the full event for reference:
We're nearly done. Now we just need to be able to increase and decrease our score.
- Add a new Keyboard On Pressed Event with key Up arrow, and add the following actions
- LeaderBoardText Instance Variables Add To
- Instance Variable: score
- Value: 1
- Optional Step: If you want to view the current score create a new Text Object and add it to your Layout
- Use Set Text action and set the text to LeaderboardText.score
- LeaderBoardText Instance Variables Add To
- Add a new Keyboard On Pressed Event with key Down arrow, and add the following actions
- LeaderBoardText Instance VariablesSubtract From
- Instance Variable: score
- Value: 1
- Optional Step: If you want to view the current score create a new Text Object and add it to your Layout
- Use Set Text action and set the text to LeaderboardText.score
- LeaderBoardText Instance VariablesSubtract From
And there you have it! Online leaderboards in your Construct 3 game.

You are now able to authenticate a player, upload a score, increase it, decrease it and retrieve the leaderboard with entries.
For testing purposes you can use the following Game API Key and leaderboardID:
API Key:11a28508c4fc1b88424d4a98b89dc1a5e79625ff
leaderboardID: 3721
This will fill your leaderboard with entries.
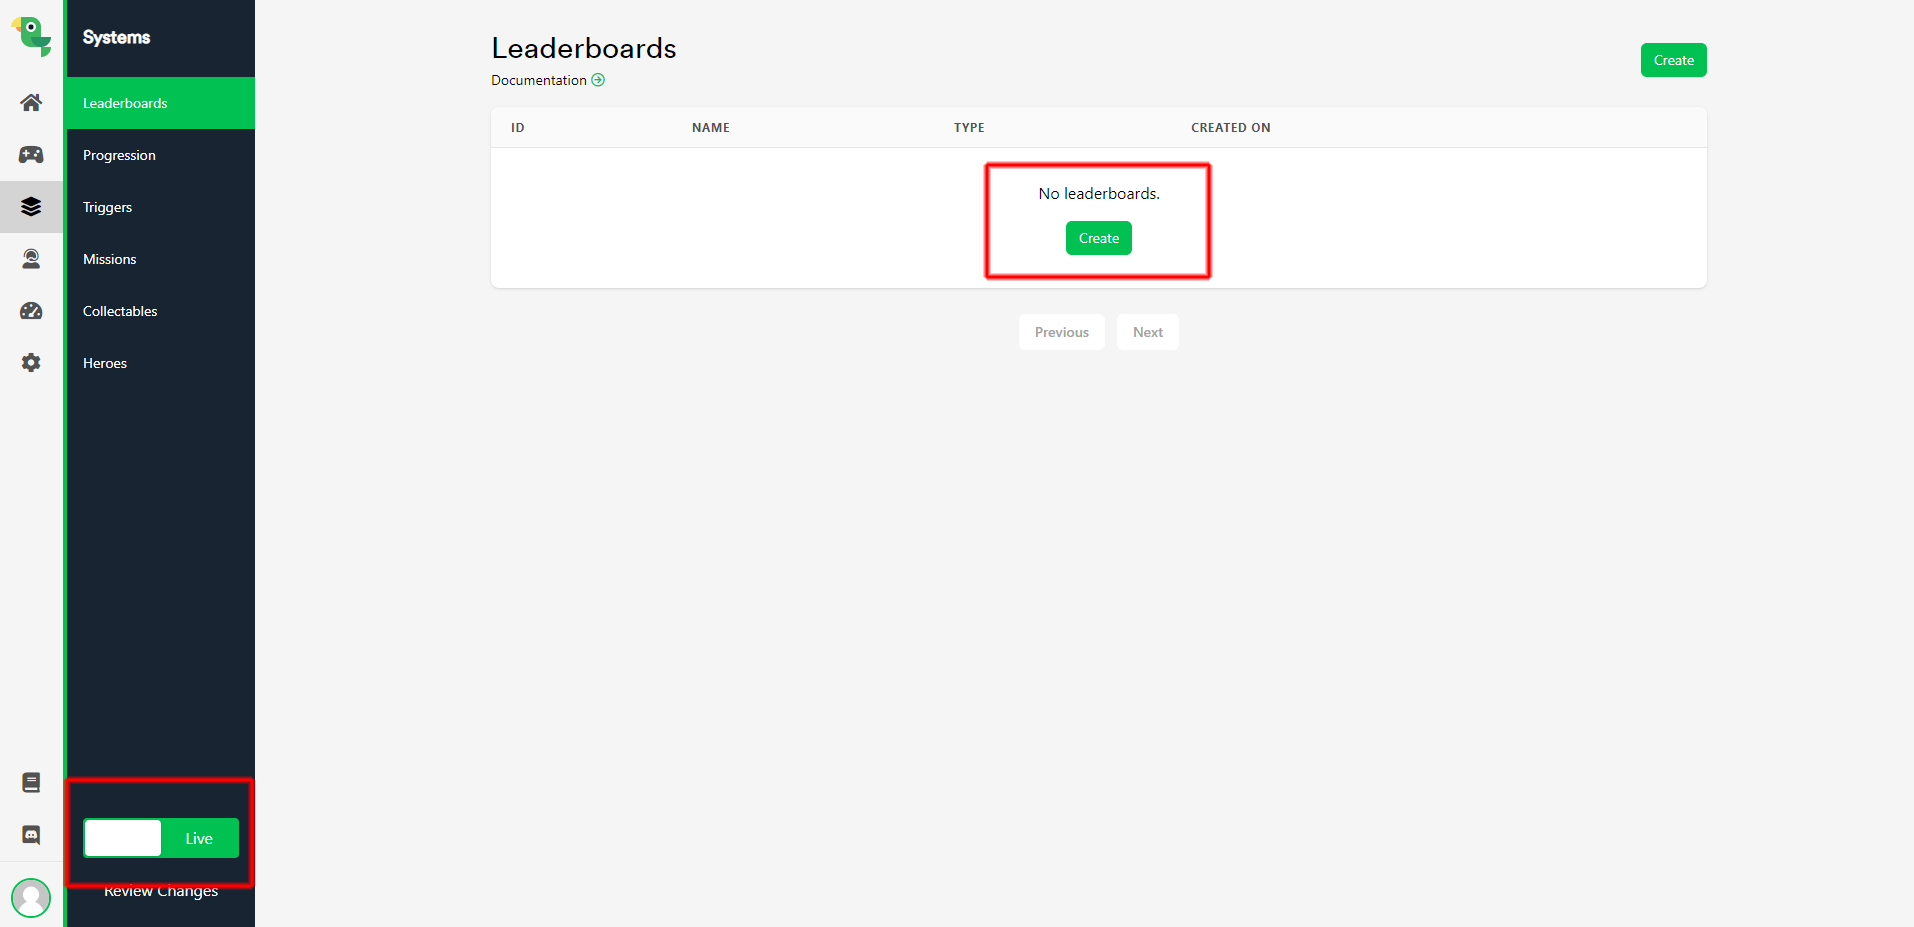
Switching Between Stage and Live Environments
When you're ready to show off your game to the public, it's always wise to change between LootLocker's Stage and Live environments. We've created these two environments so you can test your game safely using the Stage environment. Then, when you're ready for a public release, have a clean data for your players to interact with with using the Live environment.
You can switch between environments easily.
- Create a new leaderboard for the Live environment on the LootLocker Dashboard by clicking on the environment switcher in the bottom left corner of the LootLocker dashboard. Use the same leaderboardKey as with the leaderboard from the previous steps.
Now, this is only the beginning!
All of LootLockers features are now available for you to use in Construct 3 in much the same way as the above implementation.
All LootLocker features follow the same structure as the above implementation;
- Any event
- AJAX Set a response binary
- JSON Populate data
- AJAX Set headers
- AJAX Post to URL (identify with tag)
- Event AJAX On “tag” completed
- Parse response binary to JSON
- Do something with the data that you received
For every request that you make to LootLocker x-session-token and Content-Type must be included in the header, if there are additional parameters that need to be included, it is specified in the REST API.
Here are a few of the available endpoints that you can use in your game;
- Change a player's name
- Get a player's position in a leaderboard
- Store data on the player
- Upload and store files in the player's profile
Read more about all available LootLocker features on our website.
And as always, we're here when you need us!
Reach out to me on Discord, Twitter, and Reddit or contact us if you have any questions, need assistance or just want to show off your game!
Happy coding!
/Johannes